
Table of Contents
How to clean a chainsaw? Why is it important? I know many individuals who are never even thinking about cleaning their chainsaws.
However, it is a good idea to maintain your chainsaw clean, as you discover in this post.
Whenever a cutting tooth bites into the wood on the saw chain, it creates tiny, powdery chips of material together with sawdust.
These particles go into the groove of the bar on which the chain rides with the velocity of the moving chain.
Keep the chain seam operating smoothly by spending one or two minutes to check the chain seam before and after each usage.
Remove any dirt from the track, clean the chainsaw bar after every usage.
Cleaning a Chainsaw:

Some of the wood chips and sawdust also float in the gaps of each chain connection.
So, it mixes the humidity and bar oil to produce a semi-solid and extremely adhesive material.
Therefore, it absorbs the oil from the bar and inhibits it through the lubrication of the chain.
This makes your chain heat and it scraps against the bar rails. Therefore, it creates a burr at either end of the bar to develop.
Now, the chain is not only warm and causes extra friction. However, it also bounces off the irregular edge of the bar.
Therefore, it prevents you from cutting down and increasing the vibrations.
A chain not oiled will fail early, but sharp metals fly in your face at 60mph are the last thing you want.
This makes your chain heat and it scraps against the bar rails, creating a burr at either end of the bar to develop.
Now, the chain is not only warm and causes extra friction, but also bounces off the irregular edge of the bar which prevents you from cutting down and increasing the vibrations.
A chain not oiled will fail early, but sharp metals fly in your face at 60mph are the last thing you want.
Let’s discuss some of the problems that hinder a filthy seam from functioning correctly before we get to talk about the necessary instruments and how to clean a chainsaw.
The surface of a chainsaw is relatively basic, but a lot of materials are not visible until the covers are removed and the whole thing is taken apart.
Why Is It Important?
Sap, scab, oil, and other undesirable things will build on the side of the chainsaw under the clutch cover.
Now, it ultimately obstructs the oil boxes from the bar oil in your chain saw’s bar.
Moreover, it may adversely affect performance and component dependability.
However, if it collects a great amount, the inertial brake may rise. So, stopping the chainsaw might be difficult for you in case of an emergency.
In addition, you also have the option of sucking the sawdust and dirt in with the help of the grill.
Furthermore, you can do all this under the starting section on the opposite side of the motor.
This grill sucks in the air for the machine to cool up and also absorbs waste that is spat out when you cut wood.
Sawdust and wood chips can collect, limit airflow and reduce the cooling power between cooling fins on the cylinder head.
The engine will so run warmer than usual and eventually harm the engine’s internals.
Moreover, the air filter enables the motor to respire. So, when the carburetor gets stuck, there is not enough air that affects the motor performance at higher speeds.
Hence, this is how you use the air filter in this way.
You may be unable to start the chainsaw when the air filter is excessively dusty.
Moreover, you will have to examine the carbon spark plugs because the fuel/air combination will not burn up. So, it will lose power with a malfunctioning spark plug.
However, a defective spark plug may potentially prevent the engine from starting.
Every 100 hours of servicing, Stihl advises replacing the old spark plug with a new one.
There are many spark plugs, please read the owner’s handbook to ensure that you replace the old plug with a suitable model.
How to Clean A Chainsaw- The Required Tools:

The equipments and tools to clean a chainsaw:
- Brush with wire.
- Painted 1″ or 2″ pins.
- Fat pistol.
- Sprinkle with WD40.
- Some sort of universal cleaner.
- Flat hand file.
- Cleaning toolbar groove.
- Choose the oil hole for cleaning (you can also use a small flathead screwdriver).
- Scrench.
- Warm water.
The optional category for readers who have numerous chainsaws and have to clean 4 or 5 simultaneously does not require the items we have listed here.
You do not need a pressure washer or shop vacuum unless you are an experienced logger, workshop owner, or DIYer.
But if you do have a shop, you have undoubtedly the above instruments that will make cleaning your chainsaw much more comfortable.
Many skilled chainsaw users may also be unnecessary to use the universal cleaner fluid for basic home ammonia or kerosene to clean their dirty chainsaw bars and chains.
All you need is a scrench and a brush on the field for fast cleanup between cutting.
Step 1. Removal Of Bar And Chain:

We must first remove them for easier access to clean the different portions of one chain seam. You need a level, sturdy surface for this.
A workbench or table of any type would be excellent and ensure that all the instruments are kept close by.
When you clean an electric chainsaw, please be careful to unplug it from the power supply and take out the battery before starting cleaning if it is a cableless chainsaw.
Drain all liquids (gas and bar oil) before cleaning for gas chainsaws.
Now find the two nozzles on your side cover that are fitted to your bar.
So, Relax by the scrench’s hexagonal wrench and check that the reverse chain brake is freed before the clutch may be removed.
On a specific model, you can’t remove the lid, but it is difficult to put it back on other versions when a brake is applied.
Step 2. Cleaning The Bar:
Take the chain out and set it aside once the bar and chain are cut off from the powerhead.
You may have to use a degrader or solvent of some type depending on how unclean the bar is.
Therefore, it should be easier for you to clean and remove all the dirtand grime off with some warm soap and cloth.
However, if you use it to breakdown a few wood over the weekend then clean it thoroughly.
Take off the brush with the cord and scrape off from the bar all the scrap and hard dirt.
Clear all the crud in the bar rails by use of the bar groove cleaning tool or knife.
Once the bar has a clean groove, lift it or remove the oil hole from all the scrap.
Moreover, each bar features two holes. Moreover, both holes are perpendicular to each other.
Each bar contains two oil holes, one on either side of the end of the bar (the end that connects to the powerhead).
You may blast off any obstinate debris by using an air compressor.
Steam works wonderfully at about 300°F if you have a steam cleaner at the workshop also.
Hot soap water only works well for chainsaws that are used for firewood cutting infrequently on weekends.
But if you are a professional who regularly uses the chainsaw to chop wood or twigs 80 feet above the soil for felling trees?
Cleaning the dirtiest of the chainsaw guide bars is ideal for compressed air and high-pressure vapor.
But as most of you don’t have a steam cleaner or air compressor, it’s a nice little technique to get rid of the pitch and dry up resin.
So, you should use the Simple Green Pro HD chainsaw.
It is a non-corrosive biodegrading, multifunctional cleanser, used to remove all grain and filth as a solvent and degrader.
Follow The Steps:
Mix the concentrate with water in a 1:3 ratio and fill up a bucket. Then dip the bar and the clutch cover in the pail.
Now, you have to soak it and utilize the wire brush. Moreover, use the brush to clean and remove all the dirt for 10 minutes approx.
Firstly, make sure that the bar is dry, then spray WD40 lightly all over it. In the end, allow it to sit for around half an hour.
The bar is about ready to put in the chainsaw, inspect the edges to make sure the rails are not mushrooms.
If your nails click on a sharp metal burr that extrudes from the rail, it’s time to take the file of the hand and form a few crossing points on the bar.
The bar edges will be smooth and flat so that the chain can drive smoothly.
This redressing tool is an excellent instrument to remove burrs and uneven corners from the lead bar, it restores the tracks at an angle of 90° and removes all burrs simultaneously.
Step 3. Cleaning The Chain:
Take it in turpentine or home ammonia and water solution to clear the chain (for 10 to 20 mins).
All grapes and resins should be removed inside the chain, and the majority of caked sawdust dissolved.
Take the brush of the wire now and clean it. It’s important to be in a well-ventilated location and prevent contact with the skin or eyes when working with the ammonia solution. Use eye protection and gloves.
You may just scrape off dirt with a brush if the chain’s not too nasty and clean it with a towel.
Now, if it is completely enveloped in pith and caked sawdust, there is another technique for networking.
However, we’d only recommend it if you are a professional. Also, if you are not familiar with the tools then you should let the professional handle this.
Used to unblock drains, take some lye of the household. Put some pellets on the container head and mix with approximately a half water bucket.
Please do not allow these pellets to be in touch with your skin with strong gloves and eye protection.
Introduce the chain into the solution and let it soak for perhaps 20 minutes or more as it is filthy.
But don’t let it sit in overnight since the chain starts rusting.
Moreover, it is crucial that you do not use your hands to extract a chain from the solution.
However, if you think that wearing gloves will protect you, then you are in the wrong.
Throw it outdoors on the ground, let all of the extra solutions drain away, and thoroughly wash it down.
When it is dry, take the chain and wipe it with many towels of paper until the dirt is gone.
Before you place it in storage, please ensure that your newly cleaned chain is dipped in some bar oil.
It’s not going to rust in this way. Before assembling it with a guide bar, coat it with bar oil.
Step 4. Cleaning The Power Head:

Use a 1″ soft tip paintbrush to purify the power head and remove the debris surrounding the paddle casing.
Use the pick or the scrench to access tight areas and gradually remove all the debris from the clutch bolts.
Make sure that the petroleum port has no waste.
The compressed air may also be used to remove the power head, but we do not recommend the press washer, since if you are extremely cautious, it can harm the air filter and electronics.
Retire the top cover and both the air filter and the spark plug should be accessible.
Take a soft tip paintbrush and carefully purify the filter media if it is covered with a light to moderate quantity of dust.
Moreover, you need to stuff the air in the carburetor with the help of a clean stick.
Now, it would help to avoid falling into foreign items.
However, you can stick the carburetor inside, you can place the shock at a “closed position.”
However, the compressor must be set at low pressure.
If you wish to rinse the air filter in running water, Stihl suggests a non-flammable, non-huile-based cleaning.
Take warm soap water and clean it from outside if the air filter is filthy (water flows from the clean side of the filter to the dirty side).
Rinse the filter with a little clean water and allow it to dry fully before reattaching it after using the soap solution.
Follow The Steps:
To clean all the crud from between the refrigerating fins, inspect the gaps between the cooling fins of the cylinder head and use a sprinkler or bar cleaner (ideally a soft metal) tool.
This improves the cooling of the motor and increases its service life.
Remember also to remove the grill cover on the starting seal and brush the whole sawdust surrounding the crankcase away.
Lastly, you need to remove the spark plug and make sure to check for deterioration indications.
To see if the gap is too wide or little, check the split between the electrodes, and the spark plug will not function correctly.
It might be time to replace if the tip looks dark black or baked-on dirt.
Consult your owner’s handbook and ensure that the space between electrodes is checked, since a few bright plugs may not be flared from the factory.
In its NGK CMR6H and Bosch USR4AC spark plug, Stihl recommends a spacing of 0.02 inches or 0.5mm.
Step 5. Putting It All Back Together: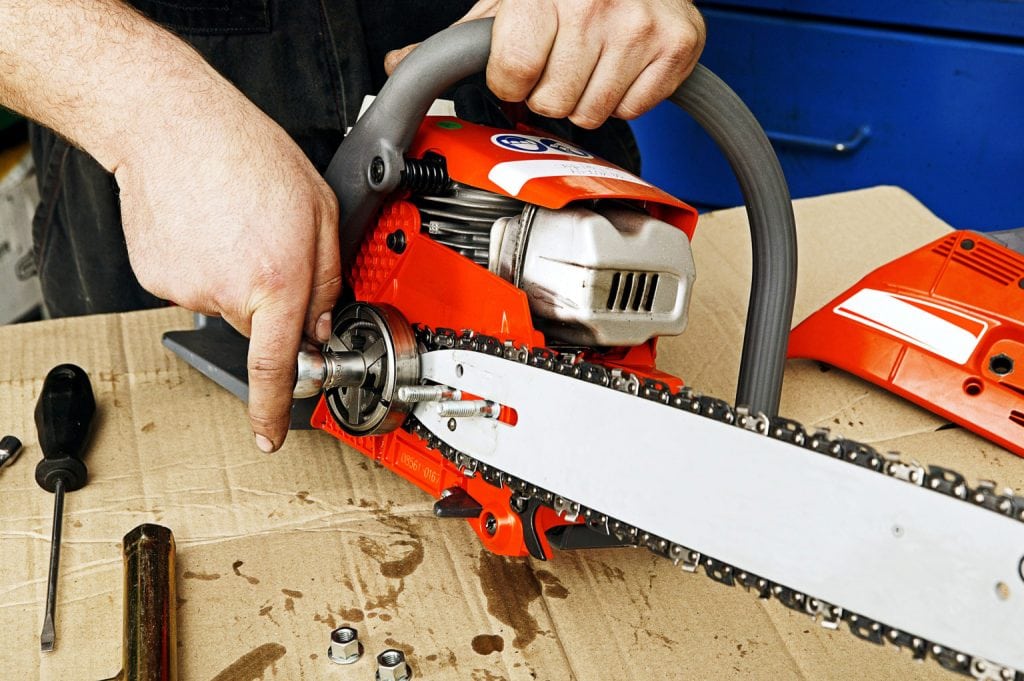

Add the lid of the engine, start the cord and retrofit the dry chain to the bar.
Ensure that the chain mounts in the direction of CORRECT. Mount the bar on the pins, attach the lid of the clutch, and tighten the nozzles.
Hold down the bar with the tip of your nose and set the tensioning screen to prevent the chain segment on the bottom of the bar from sinking (you should not over-tighten it, just enough for it to move freely).
Finally, you need to tighten the nuts with the help of the strence after you have attached the chain perfectly.
You may now chop wood and replenish it with gas and bar oil on your chain sewer.
Conclusion!
Whenever you cut tooth bites into the wood on the chainsaw, it creates tiny, powdery chips of material.
So, these particles will most probably go inside where the chain rides with the velocity of the moving chain.
Now, that you have cleaned your chainsaw correctly and thoroughly, you will notice a change in its performance.
Therefore, there are a variety of chainsaw available in the market. Moreover, even if you aren’t going to make a purchase, there’s no harm in looking.
However, it is pleasing to have as many options available as you want to get a new chainsaw.
Now, since you know everything about how to clean a chainsaw, then get to work. I hope you succeed.
Good luck!